How to Espalier Fruit Trees

The art of espalier fruit trees is all about selectively pruning and training trees into a desired shape, maximizing beauty and functionality in small spaces. Follow these steps to learn how to espalier fruit trees successfully.
The Origins of Espalier
Espalier is an ancient horticultural technique that involves pruning and training fruit trees to grow flat against a support, forming a structured, two-dimensional shape. Historically, espalier fruit trees were used in European gardens during the Middle Ages to create decorative walls and were also planted along courtyard interiors to protect buds from late-season frosts.
Records trace espaliered trees back to ancient Egypt around 1400 B.C., where fig trees were cultivated against walls in tombs. The term "espalier" (ess-PAL-yay) is derived from the French word originally referring to the trellis or support structure but is now used to describe the technique itself.
Why Espalier?
Espalier is a space-saving fruit tree training method that provides numerous benefits:
- Grow homegrown fruit in small spaces – perfect for urban gardens, patios, and narrow yards.
- Easier harvesting – No ladder required; fruit remains within arm’s reach.
- Aesthetic appeal – A visually striking garden feature that combines function and artistry.
Best Fruit Trees for Espalier
Apple and pear trees are the most commonly espaliered varieties due to their flexible branches and adaptability. Apple trees are particularly popular because their new stems remain pliable longer than pears, making them easier to train. Note that spur-bearing apple trees are even better if you want more fruit from your living fence.
Other great options for espalier include:
- Peaches – A beautiful choice for espalier, producing fragrant blooms and delicious fruit.
- Pomegranates – Thrive in warmer climates and respond well to training.
- Dwarf and semi-dwarf fruit trees – Ideal for small gardens and container growing.
If you're growing only one espaliered tree, consider a self-pollinating apple variety such as Stark® Jon-A-Red Jonathan apple or Starkspur® Golden Delicious apple to ensure fruit production without the need for a second tree.
With the right selection and proper espalier pruning techniques, you can create a living fence that is both ornamental and productive.
Where to Plant Your Espaliered Tree

Location is key. You will need about 8 feet of linear space in a well-drained spot that gets full sun. Full sun means the tree will receive at least six hours of light per day. Espaliered trees can be grown:
- Against a wall (usually brick or stucco)
- Along a fence, trellis or pergola
- Across a set of sturdy free-standing posts and horizontal wires (as many wine grapes are grown)
How to Create a Classic Three-Tier Cordon

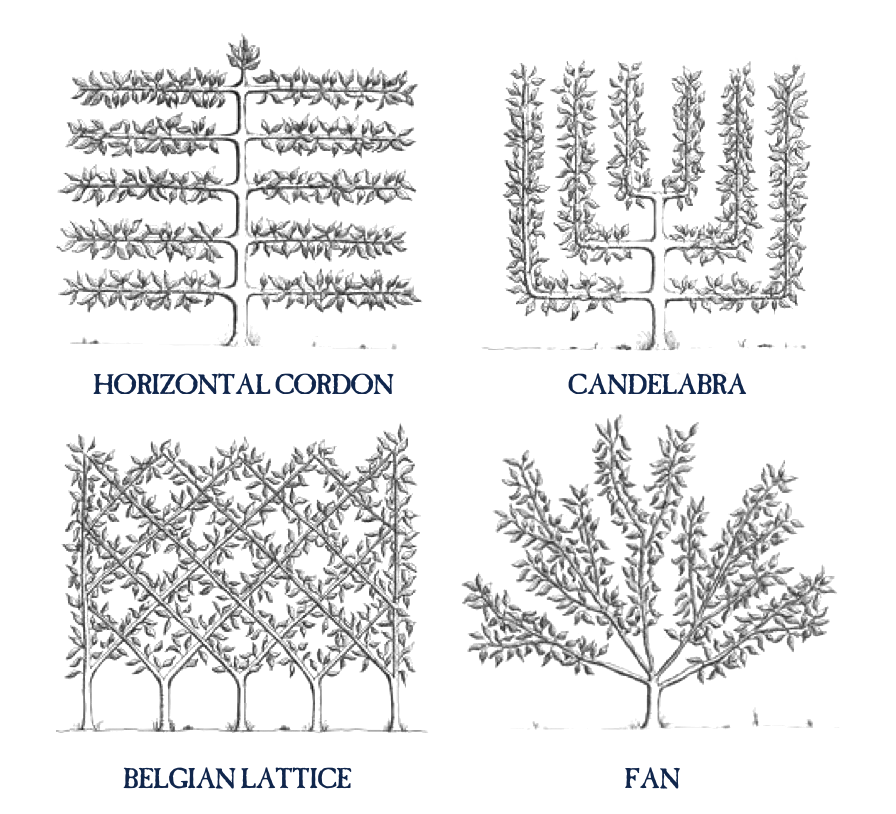
As we mentioned earlier, apple trees are easy to train to espalier, so we'll use apple trees in this example. There are four basic espalier forms (see diagram) but for purposes of this example, we'll describe how to form the three-tier horizontal cordon. The three-tier cordon is quite a simple technique; it just requires a little know-how and a few years of patience as the trees grow into it.
You will need:
- Your chosen apple tree: bare-root, any height (unbranched whips are ideal)
- Compost
- Wire cutter
- Pliers
- Drill with a 3-16" drill bit
- Digging shovel
- Pruning shears
- Stretchy plant ties or pantyhose, cut into strips
- Pencil or chalk
- Yardstick or measuring tape
- 12-gauge wire (about 28 feet total)
- 3/16" eye bolts (use 3-16" wall mounts on masonry)
Instructions:
- Choose your location (see tips above).
- Measure 4 feet up from the soil (final tree height) and center the spot on the wall or support. Chalk a vertical line (the “trunk”) from your centered spot to the ground.
- Along your vertical “trunk line,” mark a spot 16 inches from the ground (the first branch tier), and repeat twice. You will now have a 4-foot vertical line with three spots marked on it at 16-inch intervals.
- Now mark out the tree width. Begin at the first 16-inch tier mark on the "trunk" and measure 3-1/2 feet on both the right and left of the trunk. Repeat for the second and third tiers, then draw horizontal lines from point to point. What you should see is a single 4-foot vertical line intersected by three horizontal lines, 16 inches apart and 7 feet wide.
- Install the eyebolts or wall mounts to the wall/support. A bolt should be placed on the "trunk line" at ground level and where the first, second and third tiers cross. Also attach bolts to each end of each of the 3 horizontal lines.
- Thread wire through the eyebolts following the pattern drawn on the wall, both vertical and horizontal. Twist the wire at the ends to secure it, and snip.
- Now it’s time to plant your tree. In spring or fall, dig a hole in front of the vertical wire that is 12-14 inches wide and equally deep. Mix half of the shoveled-out soil with compost. Position the tree whip in the hole so that the crown sits at soil level. Remember to position it 4-5 inches from the wall with a bud just above the first-tier guide wire.
- Backfill the hole with the soil/compost mixture and water in well.
- Attach the trunk to the vertical wire, somewhere below the first-tier horizontal wire, with a stretchy plant tie to avoid bark damage.
- Take a deep breath and top the center trunk by making a cut about 1-2 inches above the first-tier wire, right above a bud. Make sure there are at least three buds below this one. This action will force the tree to send out branches at or near the first-tier height.
- During the first season, let the buds grow into new shoots. Pick the three sturdiest ones and prune off the rest. When the shoots are 3-4 inches long, gently bend and tie one to the lowest right-side horizontal wire and another shoot to the left. Your tree should now look like a lower-case "t".
- Don't let the center trunk grow more than 6” over the first tier. Snip it back as the horizontal branches grow to keep it in check.
- When the first-tier branches have grown three-quarters of the way to the end of their support wire, allow the central trunk to grow to the second tier and start the process again.
- Repeat once more until you have three tiers, each about 7 feet long from end to end.
Some examples of fruit trees trained to tiered, horizontal cordons:
These photos of espaliered fruit trees were shared with us by our customers, Timoti B. and Michael M.!


How and When to Prune Your Espaliered Fruit Tree
You may need to prune two or three times per season to keep the tree in shape. The first pruning should be after it blooms in the spring. The flowers will indicate where the fruit will be, and you can prune accordingly. (Always use very sharp, clean shears that have been dipped in diluted bleach solution, or wiped down thoroughly with an alcohol wipe, rinsed and dried after each use to prevent potential disease spread.)
While it usually takes about four years to get the full artistic effect of your efforts, you may actually see fruit as soon as the second year... but if you want the most from your espaliered tree, remove that developing fruit for a year or two.
Then keep an eye on it, nipping off vertical shoots, and removing suckers and water sprouts. Shorten the horizontal branches to encourage the development of a fruiting spur. Because there will be more fruiting spurs produced along the horizontal branches than the vertical trunk, eventually you will have many fruits setting on your espaliered tree, so make sure your support is strong.
» Looking for more information and tools for pruning espaliered fruit trees? Our Pruning Made Easy book provides instructions and tips on how to achieve a successful espalier design with our selection of pruning tools.
Watering and Fertilizing Espaliered Trees
The young tree needs the equivalent of about a gallon of water every 7-10 days until it's established. If you find that rain is keeping your tree watered, you don't need to provide any additional water. Just step in when Mother Nature leaves you dry. Find more advice on watering fruit trees:

Just like with a fruit tree growing naturally, you can apply a specially-formulated fertilizer for fruit trees as needed during the growing season. Follow the directions on the package so as not to burn the young tree roots. Find tips on fertilizing wisely:

The reward of your patience, persistence and attention to detail will provide you not only with a fine fruit crop, but with a rather spectacular living sculpture that will set your fruit garden far apart from the ordinary!
View Stark Bro's Pinterest Board: Fruit Tree Espalier »
Latest Articles
 Easy Pecan Pie Recipe (No-Fail, Classic, and Perfectly Gooey)
The Healing Power of Your Garden: Growing Plants for Apothecary and Wellness
Why You Can’t Eat Raw Elderberries (and How to Enjoy Them Safely)
When to Pick Asian Pears: Harvesting Tips for Crisp, Juicy Fruit
Summer Raspberry Pruning Tips with Matt Lebon of The Foodscaper
Backyard Orchard Tour: Growing Fruit in Small Spaces with Stark Bro’s Team Member Katie B
How To Prune Grapes - Summer Care
How to Make Redbud Jelly
Winter Preparation for Fig Trees: Cutting Back and Mulching
Easy Pecan Pie Recipe (No-Fail, Classic, and Perfectly Gooey)
The Healing Power of Your Garden: Growing Plants for Apothecary and Wellness
Why You Can’t Eat Raw Elderberries (and How to Enjoy Them Safely)
When to Pick Asian Pears: Harvesting Tips for Crisp, Juicy Fruit
Summer Raspberry Pruning Tips with Matt Lebon of The Foodscaper
Backyard Orchard Tour: Growing Fruit in Small Spaces with Stark Bro’s Team Member Katie B
How To Prune Grapes - Summer Care
How to Make Redbud Jelly
Winter Preparation for Fig Trees: Cutting Back and Mulching


